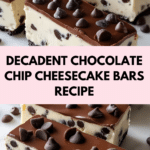
Chocolate Chip Cheesecake Bars Recipe
Indulge in these decadent Chocolate Chip Cheesecake Bars, featuring a rich chocolate cookie crust topped with a creamy cheesecake layer studded with mini chocolate chips, and finished with a luscious chocolate ganache topping. Perfectly chilled and easy to slice, these bars make an irresistible dessert for any occasion.
- Prep Time: 20 minutes
- Cook Time: 10 minutes
- Total Time: 5 hours 30 minutes
- Yield: 16 bars 1x
- Category: Dessert
- Method: Stovetop
- Cuisine: American
Ingredients
Scale
For the Crust
- 1 1/2 cups chocolate cookie crumbs (from about 20 chocolate cookies)
- 1/4 cup melted butter
For the Cheesecake Layer
- 16 oz cream cheese, softened
- 1/2 cup sugar
- 1 teaspoon vanilla extract
- 1 cup mini chocolate chips, divided
For the Chocolate Ganache Topping
- 1 cup heavy cream
- 1 cup semi-sweet chocolate chips
Instructions
- Prepare the Crust: Start by combining the chocolate cookie crumbs and melted butter in a medium bowl. Stir until the crumbs are fully coated, creating a rich, buttery base. Press this mixture into the bottom of an 8×8-inch baking pan lined with parchment paper. The parchment layer makes it easier to remove the bars once they’re set. Place the crust in the refrigerator to chill while you prepare the cheesecake filling.
- Make the Cheesecake Filling: In a large mixing bowl, beat together the softened cream cheese, sugar, and vanilla extract until the mixture is smooth and creamy. This step is essential for achieving a silky texture in the cheesecake layer. Creaming these ingredients thoroughly ensures a lump-free filling. Once smooth, gently fold in 3/4 cup of the mini chocolate chips. These will create little bursts of chocolate throughout the cheesecake layer, adding a classic cookie-like flavor.
- Spread the Cheesecake Filling: Retrieve the chilled crust from the refrigerator, then spread the cheesecake filling over it. Smooth out the top with a spatula for an even layer. Place the pan back in the refrigerator and allow it to chill for at least 3-4 hours, or until the filling is firm to the touch. Chilling helps the bars hold their shape when sliced, so this step is key for presentation.
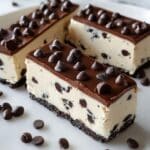
- Prepare the Chocolate Ganache: Once the cheesecake layer has set, it’s time to make the ganache. In a small saucepan, heat the heavy cream over medium heat until it just begins to simmer. Be careful not to let it boil. Remove from heat, then add the semi-sweet chocolate chips, stirring until the mixture is smooth and glossy. This ganache forms a luscious top layer, enhancing the chocolate flavor and giving the bars a professional look.
- Add the Ganache and Garnish: Pour the ganache over the chilled cheesecake layer, spreading it evenly with a spatula. For a finishing touch, sprinkle the remaining mini chocolate chips on top. This adds extra chocolate flavor and a bit of visual appeal. Return the pan to the refrigerator for an additional 1-2 hours to allow the ganache to set completely.
- Slice and Serve: Once the ganache has set, lift the cheesecake out of the pan using the parchment paper edges. This makes slicing easier and ensures the bars maintain their shape. Use a sharp knife to slice the cheesecake into bars. For clean, professional-looking slices, wipe the knife between cuts. Serve chilled to preserve the creamy texture and rich flavor.
Notes
- Use softened cream cheese for a smooth cheesecake filling without lumps.
- Press the crust firmly to avoid crumbling when slicing.
- Chill the cheesecake layer for at least 3-4 hours to ensure it sets properly.
- Do not let the cream boil when making ganache to prevent a grainy texture.
- Wipe the knife between slices for neat, clean edges.
- Store bars in the refrigerator and consume within 3-4 days for best freshness.
Keywords: chocolate chip cheesecake bars, chocolate cheesecake, no bake cheesecake bars, chocolate ganache, dessert bars
Find it online: https://tastewithamy.com/chocolate-chip-cheesecake-bars-recipe/