French Chocolate Flan Recipe
Introduction
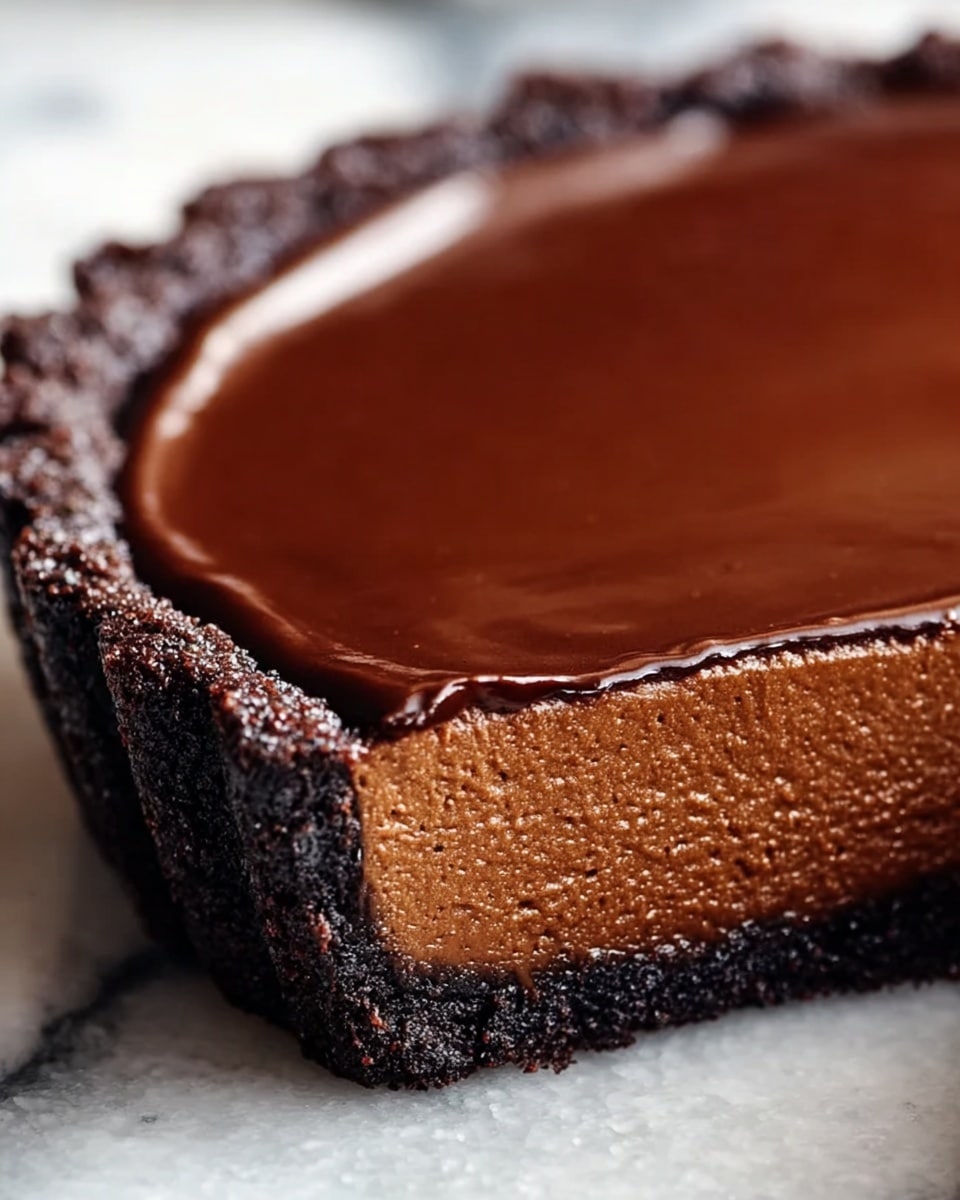
French Chocolate Flan is a decadent dessert combining a rich chocolate custard with a tender cocoa tart base. Its creamy texture and glossy finish make it perfect for special occasions or any time you crave a luscious chocolate treat.

Ingredients
- For the Chocolate Custard:
- 3 egg yolks
- 2 whole eggs
- 1 cup (200g) white sugar
- ⅓ cup (42g) cornstarch
- ½ teaspoon salt
- 2 ½ cups (600ml) whole milk
- 1 ¾ cups (400ml) heavy cream
- 7 oz (200g) dark chocolate, chopped
- 1 tablespoon jam (for brushing on top)
- For the Chocolate Tart Base:
- 1 cup (120g) all-purpose flour
- ⅓ cup (35g) icing sugar
- ¼ cup (25g) cocoa powder
- ¼ teaspoon salt
- 1 stick (114g) butter, melted
- ½ teaspoon vanilla extract
Instructions
- Step 1: Make the Chocolate Tart Base. In a bowl, combine the flour, icing sugar, cocoa powder, and salt.
- Step 2: Preheat the oven to 350°F (180°C) and line a baking sheet with parchment paper.
- Step 3: Melt the butter in the microwave and add it to the dry ingredients with the vanilla extract. Mix until a smooth, thick paste forms.
- Step 4: Knead the mixture into a dough with 3-4 turns, being careful not to overwork it.
- Step 5: Flatten the dough into a large circle slightly bigger than your pastry ring, using hands or a small rolling pin. The edges can be rough as they will be trimmed.
- Step 6: Bake for 10 minutes or until the top looks dry.
- Step 7: Immediately press the pastry ring into the baked pastry like a large cookie cutter. Do not remove the pastry ring.
- Step 8: (Optional) If using a loose-bottomed cake pan instead of a pastry ring, see notes for adjustments.
- Step 9: Make the Chocolate Custard. Whisk the egg yolks, whole eggs, and sugar together for about 30 seconds until slightly lightened.
- Step 10: Add cornstarch and salt, whisking until smooth.
- Step 11: Heat milk and cream over medium heat until steam rises. Slowly add a small amount of hot milk to the egg mixture, whisking constantly. Gradually add remaining milk while whisking to avoid cooking eggs.
- Step 12: Return the mixture to the saucepan and cook over medium-low heat, whisking continually until it bubbles and thickens, about 1-2 minutes more.
- Step 13: Custard is ready when it coats the back of a spoon and a line remains when you run your finger through it.
- Step 14: Remove from heat and strain if needed to remove lumps.
- Step 15: Add chopped dark chocolate to custard and whisk until fully melted and smooth.
- Step 16: Assemble the flan. Trim excess pastry from the sides while the pastry ring is still in place and lightly grease its inside.
- Step 17: Pour chocolate custard into the ring and smooth the top with a palette knife.
- Step 18: Bake for 50-60 minutes. The edges should be set while the center remains slightly jiggly.
- Step 19: Cool to room temperature, cover with plastic wrap, and refrigerate overnight.
- Step 20: Carefully remove the flan from the pastry ring; use a sharp knife or gentle heat if it sticks.
- Step 21: For a glossy finish, melt 1 tablespoon of jam (apricot or strawberry) in the microwave for 20 seconds, then brush a thin layer over the top.
Tips & Variations
- Use high-quality dark chocolate (70% cocoa or above) for the best flavor and richness.
- Apricot jam provides a classic glossy finish, but strawberry or raspberry jam adds a nice fruity note.
- For a gluten-free version, substitute all-purpose flour with a gluten-free flour blend.
- Be gentle kneading the dough to avoid tough pastry.
- If you don’t have a pastry ring, a cake pan with removable sides can work—just adjust baking time slightly.
Storage
Store the flan covered in the refrigerator for up to 3 days. For best texture and flavor, consume within this time. Reheat gently in a warm oven if desired, but the flan is best enjoyed chilled.
How to Serve
Serve this delicious recipe with your favorite sides.
FAQs
Can I use milk instead of cream in the custard?
Using only milk will result in a lighter texture, but the custard may be less rich and creamy. For best results, use the combination of whole milk and heavy cream as specified.
How do I know when the custard is cooked?
The custard is done when it thickens enough to coat the back of a spoon and holds a clear line when you run your finger through it. It should also start to bubble gently in the pan.
PrintFrench Chocolate Flan Recipe

This French Chocolate Flan recipe combines a rich chocolate custard with a delicate chocolate tart base for a decadent dessert. The silken custard is baked atop a crisp cocoa-infused pastry crust, resulting in a creamy yet structured flan with a glossy jam finish. Perfect for chocolate lovers, this elegant treat requires careful layering and baking to achieve a smooth, jiggly center with a firm edge, making it a true showstopper for any occasion.
- Prep Time: 25 minutes
- Cook Time: 1 hour 10 minutes
- Total Time: 12 hours 35 minutes
- Yield: 8 servings 1x
- Category: Dessert
- Method: Baking
- Cuisine: French
Ingredients
For the Chocolate Custard:
- 3 egg yolks
- 2 whole eggs
- 1 cup (200g) white sugar
- ⅓ cup (42g) cornstarch
- ½ teaspoon salt
- 2 ½ cups (600ml) whole milk
- 1 ¾ cups (400ml) heavy cream
- 7 oz (200g) dark chocolate, chopped
- 1 tablespoon jam (for brushing on top, apricot or strawberry)
For the Chocolate Tart Base:
- 1 cup (120g) all-purpose flour
- ⅓ cup (35g) icing sugar
- ¼ cup (25g) cocoa powder
- ¼ teaspoon salt
- 1 stick (114g) butter, melted
- ½ teaspoon vanilla extract
Instructions
- Prepare the Chocolate Tart Base: In a bowl, mix together the flour, icing sugar, cocoa powder, and salt. Melt the butter in the microwave and add it along with vanilla extract to the dry ingredients. Stir until a smooth, thick paste forms, then knead gently 3-4 times to form a dough without overworking it.
- Shape and Bake the Tart Base: Flatten the dough into a circle slightly larger than your pastry ring using your hands or a small rolling pin. Place on a parchment-lined baking sheet. Bake in a preheated 350°F (180°C) oven for 10 minutes until the surface is dry.
- Trim the Tart Base: Immediately press the pastry ring into the warm tart base like a large cookie cutter without removing the ring. If using a loose-bottomed cake pan, see notes for alternative steps.
- Make the Chocolate Custard Mixture: Whisk egg yolks, whole eggs, and sugar in a bowl for 30 seconds until slightly lightened. Add cornstarch and salt, whisking until smooth.
- Temper the Eggs with Hot Milk and Cream: Heat milk and cream in a saucepan over medium heat until steaming. Gradually whisk small amounts of this hot liquid into the egg mixture to temper it and prevent curdling, continuing to add while whisking constantly until fully combined.
- Cook the Custard: Pour the combined mixture back into the saucepan, reduce heat to medium-low, and whisk continuously until it bubbles and thickens—about 1-2 minutes more. The custard should coat the back of a spoon with a clear line when you run your finger through it.
- Incorporate Chocolate: Remove from heat. Optional: strain if lumps form. Add chopped dark chocolate and whisk until smooth, fully melted, and homogeneous.
- Assemble the Flan: Ensure pastry ring remains on the cooled tart base. Trim any excess dough from sides and lightly butter the inside of the ring. Pour the chocolate custard into the ring and smooth the surface with a palette knife.
- Bake the Flan: Bake at 350°F (180°C) for 50-60 minutes until edges are set but the center still jiggles slightly.
- Cool and Chill: Let cool to room temperature, then cover with plastic wrap and refrigerate overnight to fully set.
- Finish the Flan: Carefully remove the ring—use a sharp knife or warm gently if it resists. Melt 1 tablespoon of jam in the microwave for 20 seconds and brush a thin, glossy layer over the top of the flan for a beautiful finish.
Notes
- If you don’t have a pastry ring, a loose-bottomed cake pan can be used but you may need to carefully press the tart base and custard as it won’t have the same sharp edges.
- Kneading the dough too much can make the tart base tough; handle gently.
- Tempering the egg mixture with hot milk slowly is essential to prevent scrambling the eggs.
- Use a good quality dark chocolate (around 70% cacao) for intense flavor.
- Apricot jam is traditional for glazing, but strawberry jam is a tasty alternative.
- Ensure the flan is fully chilled overnight before removing from the ring to maintain its shape.
Keywords: French Chocolate Flan, Chocolate Custard Flan, Chocolate Tart Base, French Dessert, Chocolate Custard, Elegant Chocolate Flan